WYSIWYG(ウィジウィグ)エディタ
What You See Is What You Get (見たままをゲットする)エディタ
テキストエディタ、Quill.jsの画像保存に注意
Quill.js標準の設定の場合は、画像の一時保存の状態は、画像がBase64化された状態でsrc-“”の保存先名が長くなるので注意すること。
参考サイト:https://nebikatsu.com更新日:
Quill.jsの画像ファイル追加の状態
参考したWEBサイトの説明の補足です。Quill.jsの標準imgアイコンで画像をアップロードすると、inputタグのファイル参照しているのと同じ状態で、WEBサーバー側に保存は行っていない状態。
HTML
<!-- ファイル参照 -->
<input id="img_upload" type="file" />

画像参照後に発火させてjs処理を行う場合はこう記述する。
HTML
<!-- onchangeでファイル参照完了後にjs処理setImage()を実行 -->
<input id="img_upload" type="file" accept="image/gif,image/jpeg,image/jpg,image/png" onchange="setImage()" multiple />
テキストエディタ、Quill.js設置後のPOST送信処理の準備
Quillは、jsでテキスト形成をしてくれるが、FormタグでPOSTで送るための値を含まないので、jsにより<input>タグに内容をセットする処理が必要になる。受取ったPOSTの処理はjsだけで行うよりPHPでは簡単なので、ここではQuill.jsからPOSTを送るまでのjsによる送信準備を記載。
PHP
//POSTデータも配列化すると確認が楽
$post_data = array();//配列初期化
if( isset($_POST)){
	$post_data = $_POST;
}//
js入力したテキスト内容を一時的にCookie保存を行う
単純に文字列をjsで取得してセットするだけで大丈夫だが、POSTエラーなど、DB登録する途中でデータロストするのを防ぎたいので、一時的にCookieに保存するという方法。
リアルタイムでHTML表示する onInput
onInput=””を利用すると、テキストを入力する度にデータを更新できるのでリアルタイム表示に利用できる。
PHP
<?php
// Quill.jsのPOST送信準備
//	onInput=入力があった時、onClick=クリックされた時、jsでshowPreview1()処理COOKIE["text"]保存
// PHPのnl2br()関数で改行を表示する

	$content ="";//修正更新したいHTML内容

	if($_COOKIE["text"] ==""){
		setcookie('text',$content,time()+60*60*1*0);//60秒x60分
	}//
?>
		<!-- quill-editor  -->
		<div id="app">
			<form method="post" action="" enctype="multipart/form-data" >
				<div id="editor_area" onInput="showPreview1()"><?php  echo nl2br($_COOKIE["text"]); ?></div>
				<input type="hidden" name="main" id="project_contents_inner">
				<button type="submit" name="subbtn" onClick="showPreview1()">一時保存(Cooki)</button>
			</form>
		</div>
		<!-- //quill-editor  -->

		<!-- 表示エリア --->
		<textarea id="editor_area2" name="html_text" ></textarea>
		<div id="coment_area" ></div>
		<!-- 表示エリア ここまで --->
Java Script
//js
//保存したCookiをキー名ごとに配列化する

//-----------------------
// 	Cookieの全読み込み
//	var cookies = document.cookie;
//	var c_text = decodeURIComponent(cookies); //encodeURIComponentエンコードを戻す
//---------------------

//-----------------------
// Cookieを連想配列に格納
//-----------------------
function getCookieArray(){
	var arr = new Array();

	if(document.cookie != ''){
		var tmp = document.cookie.split('; ');
		for(var i=0;i<tmp.length;i++){
			var data = tmp[i].split('=');

			arr[data[0]] = decodeURIComponent(data[1]);
		}
	}
	return arr;
}//
記載したHTML内容は、jsの.innerHTMLで取得や表示が可能。
Quillのエディタの内容エリアは(ql-edito)というクラスから取得する。
Java Script
//変数textがDBに保存する内容
var text = document.querySelector('.ql-editor').innerHTML;
取得した(ql-edito)クラスの内容をtype=”hidden”にしているinputタグにjsで表示してformでPOSTとして渡すとDBに保存が可能。
もし本ページのプログラムを参考に、Cookieに一時保存しているなら、そのCookieの内容をそのままDBに保存すればよいので、簡単です。
Quillの内容を、HTML状態で確認する、HTMLコード状態にする。
Cookieに一時保存した内容を、HTML状態で確認するために<div>タグjsで表示している。HTMLコード状態は<textarea>に表示している。textareaにはjsでQuillの内容を表示する部分をコメントアウトしている。
prettyprintを適用した状態で表示
<Code>部分は、prettyprintでコードを装飾して表示したいのでjs文字列を書換ている。
HTML
<!-- prettyprintを適用するときのクラス設定 -->
<pre><code class="prettyprint linenums lang-php">
textareaでの改行方法
<textarea>では、改行がうまく表示出来ない場合があるので、改行コードの「¥n 」へ置き換えて、CSSに「white-space: pre-wrap」設定が必要。ローカル環境の場合、Windowsの改行コードは「¥r¥n」を。Macの改行コードは「¥r」なので注意する。
CSS
/* css */
textarea ,
textarea div ,
textarea div p{
	white-space: pre-wrap;
}
jsで内容を再表示する
| .value | HTMLタグが有効になり、pタグ内のテキストのみ表示 |
|---|---|
| .innerText | サニタイズされHTMLタグ<p>も表示される |
| .innerHTML | サニタイズ後の特殊記号で表示される |
Java Script
//-------------------------
//Cookieに一時保存する処理
//-------------------------
function showPreview1(){

	var text = document.querySelector('.ql-editor').innerHTML;

	//cookieが使えるか確認
	if (navigator.cookieEnabled) {

		//----------------
		//Cookie保存
		//----------------
		document.cookie = "text=" + encodeURIComponent(text);//エンコードして”text”でCookie保存

		//------------------------
		// Cookieのkeyを指定して取得
		// 「 キー名が”text” 」というCookie情報が保存されているとする
		//-----------------------
		var arr = getCookieArray();//functionでCookiの配列読込
		//var c_text = 'textのCookie内容:' + arr['text'];	//キー名['text']の内容をc_textにセット
		var c_text = '' + arr['text'];	//''を足すことで、文字列として認識させる。

		//-------------------------------------------
		//表示エリアにCookie保存した内容を表示する
		// ('coment_area')は<div>内に表示
		// ('editor_area2')はtextareaにHTMLコードとして表示
		//-------------------------------------------

		//document.getElementById('editor_area2').innerText = '`'+ t_text  + '`';// <div id="cookie_v"></div>内にサニタイズ後特殊記号でHTMLとして表示

		var c_text  = c_text .replace('<pre>', '<pre><code class="prettyprint linenums lang-php">');
		var c_text  = c_text .replace('</pre>', '</code></pre>');
		document.getElementById('coment_area').innerHTML = c_text;// <div id="cookie_v"></div>内にサニタイズ後特殊記号でHTMLとして表示

	 	//document.getElementById('editor_area2').value = c_text;// <div id="cookie_v"></div>内にテキストとして表示
	 	//document.getElementById('editor_area2').innerText = c_text;//<div id="cookie_v"></div>内にサニタイズされHTML表示
		//document.getElementById('editor_area2').innerHTML = c_text;//<div id="cookie_v"></div>内にサニタイズ後特殊記号でHTMLとして表示

	}//end_if

}//end_function
上記では、textareaに表示する部分をコメントアウトしている。textareaで表示するとHTMLコードは改行なしの連続した内容で生成されている。
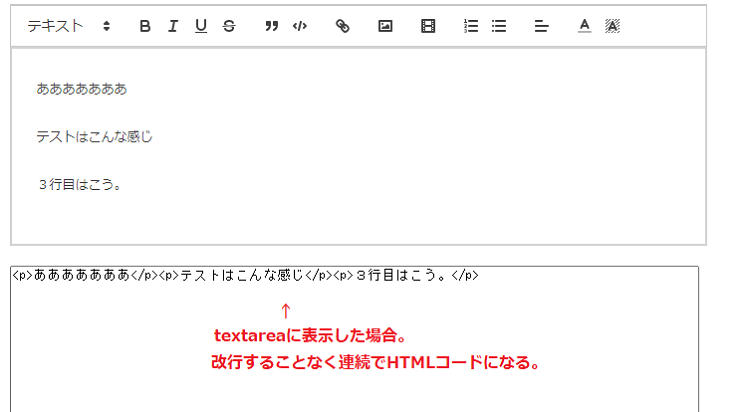
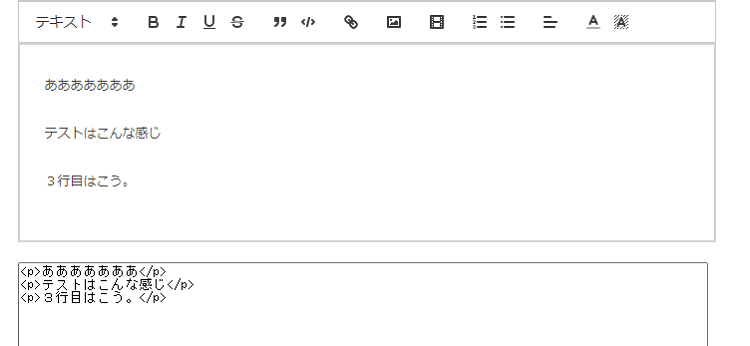
jsで文字列を置き換えでもいいですが、Cookieに保存したデータがあるので、ここではPHP処理で改行を追加して整形しています。
PHP
//Cookieの内容をtextarea用に整形する
	$content ="";//修正更新したいHTML内容
	$get_html_data ="";//HTML表示用に訂正後の内容

	if($_COOKIE["text"] ==""){
		setcookie('text',$content,time()+60*60*1*0);//60秒x60分
	}else{
		$content = $_COOKIE["text"];
		$content = str_replace("<p><br></p>", "\n\n" ,$content );
		$content = str_replace("<br>", "\n" ,$content );
		$content = str_replace("</p>", "</p>\n" ,$content );
		$content = str_replace("<tr>", "\n<tr>" ,$content );
		$content = str_replace("\n</td>", "</td>" ,$content );
		$content = str_replace("<table>", "\n<table>\n" ,$content );
		$content = str_replace("</table>", "</table>\n\n" ,$content );
		$content = str_replace("</tbody>", "\n</tbody>\n" ,$content );
		$content = str_replace("<h2>", "\n<h2>" ,$content );
		$content = str_replace("</h2>", "</h2>\n" ,$content );
		$content = str_replace("<h3>", "\n<h3>" ,$content );
		$content = str_replace("</h3>", "</h3>\n" ,$content );
		$content = str_replace("</blockquote>", "</blockquote>\n" ,$content );

		//コード部分の書き換え
		$content = str_replace('<div class="ql-code-block-container" spellcheck="false"><div class="ql-code-block" data-language="plain">', "\n\n\<pre><code>\n" ,$content );
		$content = str_replace('</div></div>', "\n</code></pre>\n" ,$content );

		setcookie('post_data',$content,time()+60*60*1*0);//60秒x60分
	}//end_if
改行コードを追加してHTMLコードの状態でもみやすくした。
更新日:
Quill.jsでテーブルを追加拡張するサンプルコード
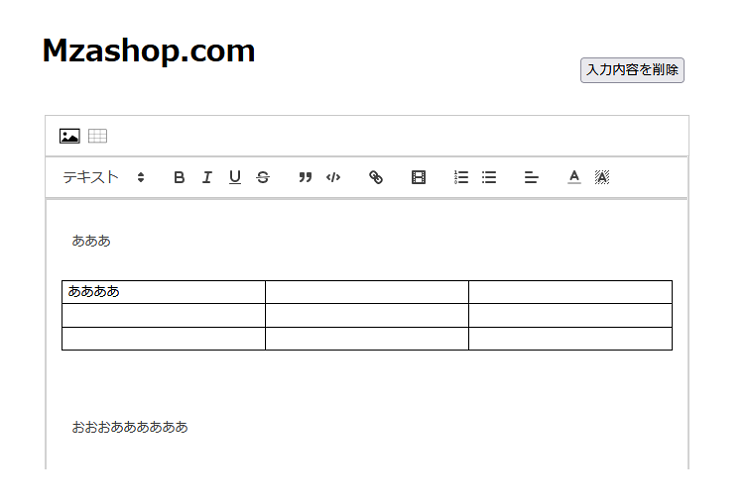
面倒なtableを追加してくれる拡張モジュールを作ってくれた方がいますね。quilljs v2.0.0-dev.3が必要です。テーブルモジュールの実装を説明してくれているサイトもあるので参考に。
テーブルの追加参考サイト Quill 2.0 Table Demoプログラムコード読み込むjsを変更する
せっかくなのでオリジナルアイコンをsvgでつくってみました。
テーブル追加拡張したことでToolの部分が少し変更しているので、コードごとサンプルを参考にどうぞ。
HTML
<head>

	<script src="https://cdnjs.cloudflare.com/ajax/libs/quill/2.0.0-dev.3/quill.min.js" type="text/javascript"></script>
	<link href="https://cdnjs.cloudflare.com/ajax/libs/quill/2.0.0-dev.3/quill.snow.min.css" rel="stylesheet">

	<script src="https://unpkg.com/quill-table-ui@1.0.5/dist/umd/index.js" type="text/javascript"></script>
	<link href="https://unpkg.com/quill-table-ui@1.0.5/dist/index.css" rel="stylesheet">

</hrad>

<body>
	<!-- 内容の全削除ボタン -->
	<button style="float:right;" onClick="Delete()">入力内容を削除</button>

<!-- 独自toolbar -->
<div id="toolbar-container" class="ql-toolbar ql-snow">
	<!-- 画像 -->
	<button id="btn_img_Upload" >
		<svg viewBox="0 0 228 183"><rect x="16" y="25" width="198" height="141" fill="#fff"/>
		<path d="M208,30V160H21V30H208m11-11H10V171H219V19Z"/>
		<polygon points="26 153 64 109 99 134 141 87 199 123 199 153 26 153"/><circle cx="66" cy="73" r="18"/></svg>
	</button>

	<!-- テーブル -->
	<button id="btnTable">
		<svg viewBox="0 0 228 183">
		<rect x="22" y="29" width="183" height="133" fill="none" stroke="#000" stroke-miterlimit="10" stroke-width="4"/>
		<line x1="22" y1="75" x2="205" y2="75" fill="none" stroke="#000" stroke-miterlimit="10" stroke-width="2"/>
		<line x1="22" y1="117" x2="205" y2="117" fill="none" stroke="#000" stroke-miterlimit="10" stroke-width="2"/>
		<line x1="82" y1="29" x2="82" y2="162" fill="none" stroke="#000" stroke-miterlimit="10" stroke-width="2"/>
		<line x1="143" y1="29" x2="143" y2="162" fill="none" stroke="#000" stroke-miterlimit="10" stroke-width="2"/></svg>
	</button>
</div>
<!-- 独自toolbar -->


<!-- quill-editor  -->
<div id="app">
	<!-- Quill main -->
	<div id="editor_area" onInput="showPreview1()"></div>
</div>


<script>


/*--- 追加ボタン ---*/

//画像アップ
document.getElementById('btn_img_Upload').addEventListener('click', function() {
  console.log(quill.getContents());
});

//テーブル追加
document.getElementById('btnTable').addEventListener('click', function() {
  let table = quill.getModule('table');
  console.log(table);
  table.insertTable(3, 3);
});


/*---- 公式ツールバー -------*/

//--- Tool設定 ---*/
var toolbarOptions = [
  [{ header: [ 2, 3,false] }],
  ['bold', 'italic', 'underline', 'strike'],        // toggled buttons
  /* [{ 'size': ['small', false, 'large', 'huge'] }],  // custom dropdown*/
  ['blockquote', 'code-block'],
  ['link'],
 /* ['image'],*/
  ['video'],
  [{ 'list': 'ordered' }, { 'list': 'bullet' }],     // superscript/subscript
  [{ 'align': [] }],
  [{ 'color': [] }, { 'background': [] }],          // dropdown with defaults from theme
 /* ['clean']                                         // remove formatting button*/
];

//-- Tool表示 ---*/
Quill.register({
  'modules/tableUI': quillTableUI.default
}, true)

const quill  = new Quill('#editor_area', {
  bounds: '#edito',
  modules: {
	table: true,
	tableUI: true,
	toolbar: this.toolbarOptions,
	history: {
		delay: 10,
		maxStack: 10,
		userOnly: true
	},
  },
  placeholder: 'ここに記事を入力します',
  theme: 'snow'
});


/*---- テーブル追加js ------*/

var bubble = new Quill('#bubble-container', {
  theme: 'bubble',
  modules: {
    table: true,
  }
});
var snow = new Quill('#snow-container', {
  theme: 'snow',
  modules: {
    table: true,
    tableUI: true
  }
});
var output = new Quill('#output-container', {
  theme: 'bubble',
  modules: { table: true },
  readOnly: true,
})
bubble.on('text-change', function(delta, old, source) {
  if (source === 'user') {
    snow.updateContents(delta, 'api');
    updateOutput();
  }
});
const table = snow.getModule('table');
snow.on('text-change', function(delta, old, source) {
  if (source === 'user') {
    bubble.updateContents(delta, 'api');
    updateOutput();
  }
});


function updateOutput() {
  const bubbleContent = bubble.getContents();
  const snowContent = snow.getContents();
  // TODO compare
  output.setContents(bubbleContent);
  const outputContent = output.getContents();
  // TODO compare outputContent
}

document.querySelector('#insert-table').addEventListener('click', function() {
  table.insertTable(3, 3);
});


/*-- Delete()  --*/

function Delete(){

	//----------------
	//Cookie削除
	//----------------
	document.cookie =  "text=; expires=0";//Cookieを削除する

	//--------------------
	//エディタを空にする
	//--------------------
	quill.setContents([
		{ insert: '' },//文字列の空をセット
		{ insert: '\n' }//コンテンツに再セットするとき最後に改行をセットする。
	]);
}


</script>


</body>
テーブル拡張を追加したらonchangeが発火しない
quill公式の内容に合わせて発火方法を変更した。
Java Script
//---------------------------------
//Quillエディタに変更があれば発火
//---------------------------------
quill.on('text-change', function(delta, oldDelta, source) {

	//ここに処理を記載する

	//取得したQuillエディタの内容はtext変数にセット
	var text = document.querySelector('.ql-editor').innerHTML;
});
Quill.jsをカスタマイズするためのAPI一覧
最初は複雑そうにみえて、わかってくると、カスタマイズ自由度が高くてQuill用のjsを考えるのがそれなりに楽しい。
さらにカスタマイズするために、Quill.js独自のAPI一覧を紹介したサイトがあったので参考に。
参考https://cly7796.net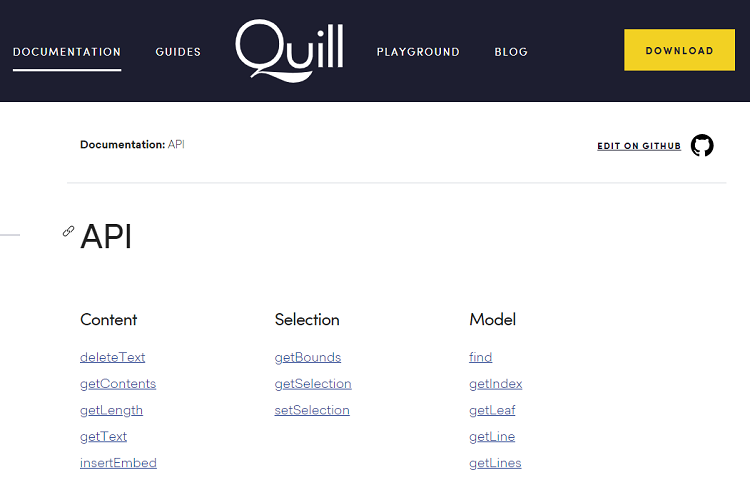 Quill公式API
更新日:
Quillで画像のWEBサーバー保存方法とalt追加、画像サイズを追加する方法
Quill標準のimageツールバーでは、WEBサーバーに一時保存している状態。ここから、目的のディレクトリに画像を保存する。
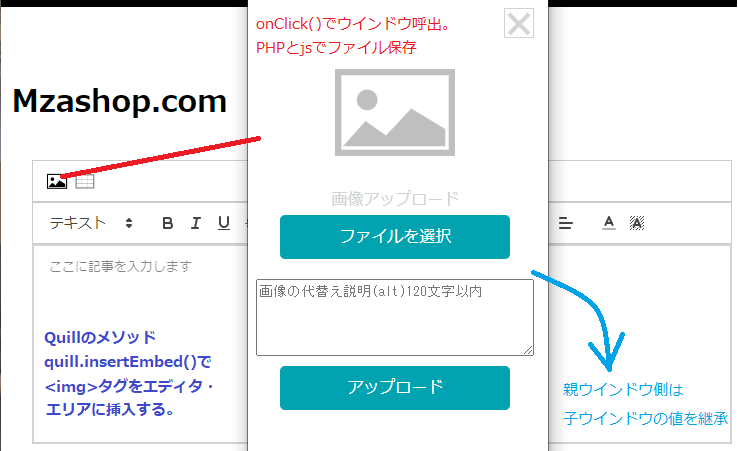
独自設置のImgアイコンから画像を保存する
上記のプログラムで画像svgアイコンを設置していました。この独自Imgアイコンをクリックしたときに、画像を追加するなら次のようなQuillのinsertEmbedメソッドで追加が可能。エディタエリアに画像が挿入される。
Java Script
//Quillのエディタエリアに画像を挿入
document.getElementById('btn_img_Upload').addEventListener('click', function() {
	var img_dir = '../img/test_img.png'; //imgの相対ディレクトリ
	quill.insertEmbed(10, 'image', img_dir );
}, false);
imgタグにalt属性とサイズheight,widthを追加して、画像のwidthとheight値を追加したい。方法はいくつかある。
(1)Quill標準のimageを利用。POSTをSBに保存する際に、画像をサーバーに保存する。
(2)画面移行せずに、Ajaxを使って画像をサーバーに保存する。
(3)サーバーにActive Storageを用意する。
(4)別ウインドウで画像保存する。
結果、別ウインドウで画像を保存する方法を選択。alt文を追加するテキストエリアが必要だったので、ここでは別ウインドウ呼出することにした。別ウインドウの画面を作ることで、Quillに限らず、画像を保存する処理を、色々な箇所で使い回せます。
PHPでサーバー保存するメリットはJSだけのバリテーションチェックするよりもセキュリティ面でも良かったから。
子ウインドウ側でサーバーに画像を保存すれば、親ウインドウにjsの値を受け渡しが簡単に出来るので、エディタに画像を挿入する際も楽です。上記のように、QuillをCookie保存しながら入力できる仕様にしたので、画面移行していたも問題はないのですが。別ウインドウ側もCSSでカラーを変えれば、それなりに、良い感じになります。
別ウインドウ非推奨対策
別ウインドウを読み出しはGoogleChromeでは非推奨なので、予め、PHPで別ウインドウ部分のファイルをPHPでinclude読込にしておいて、通常は非表示にする。別ウインドウ部分は、アラートにしたり、非表示にしていて、onclickで表示に切り替えるという方法が簡単。
imのaltの追加をjsでアラートを呼出て追加する場合
アラートでalt属性を追加する方法は、既に行っている方がいたので、翻訳されたページがあるので参考に。
アラートでalt属性設置の参考Java Script
//super.createで画像タグを作成
class CustomImage extends BlockEmbed {
  static create (value) {
    let node = super.create()
    let img = document.createElement('img')
    img.setAttribute('alt', value.alt || '')
    img.setAttribute('src', value.url)
    node.appendChild(img)
    return node
  }
static formats (node) {
    let format = {}
    // do something with format for example format.alt = node.setAttribute('alt')
    // it's need to save changes in Delta
    return format
}
// also need to define static value
static value (node) {
    return {
      alt: node.getAttribute('alt'),
      url: node.getAttribute('src')
    }
  }
// and "public" typical method in JS
format (name, value) {
  if (name === 'alt') {
    this.domNode.alt = value
  }
}
imgかどうかのチェックをjsで
Java Script
document.addEventListener('click', e => {
  if (e.target.tagName.toUpperCase() === 'IMG') {
    // just open popup and pass to it all settings from your blot image
    // for get all props from image use let blot = Parchment.find(e.target)
    // read more about this below
  }
}
画像のプロパティを取得して、画像のDOM要素を直接変更せず、ブロット(履歴)を使用し、てalt属性を追加している。
Java Script
import Parchment from 'parchment'
let blot = Parchment.find(this.currentImg)
// blot contain all what you need, all properties
// and you can change them in this way:
blot.format('alt', e.target.value)
DBに保存を読み出し、内容をQuillに再表示する方法
もし、Quillで表示している見た目そのままを表示ページでも使うなら、Quillと同じクラスを用意する。
PHP
<div class="ql-snow">
    <div class="ql-editor">
        <?php echo $dataFromDb; ?>
    </div>
</div>


